
How to Make a Tesla Roadster 0-60 AI Video from One Photo
Make a Tesla Roadster 0-60 AI video with any car: open the launch scene, upload one sharp car photo, tweak the prompt, pick 16:9 or 9:16 and generate.
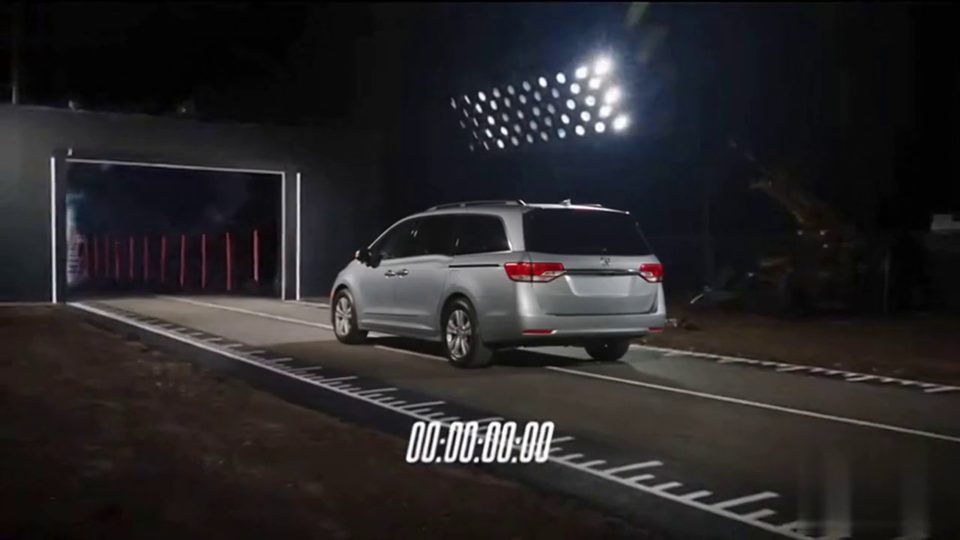
To make a Tesla Roadster 0-60 AI video, open the 0-60 launch scene in the studio, upload one sharp photo of your car and select Generate. The scene comes with a written prompt for the whole launch: thrusters, a wall of smoke, a drone chase and a pass through the finish line.
You don't need a Roadster. The example below stars an everyday minivan, and any car works. Roadster AI Video is an independent project and is not affiliated with Tesla or SpaceX.
What the Tesla Roadster 0-60 video is
Tesla's October 15, 2026 Roadster livestream showed the car jumping and flipping on cold-gas thrusters, as reported by Electrek. This scene takes the thruster idea and turns it into a fictional drag-strip launch.
Your car waits on the start line at dusk with stadium lights behind it. Cold-gas thrusters fire with a sharp burst of white vapor, a wall of smoke rolls across the strip and the car launches. A high drone shot chases it down the strip, and a low side angle catches it blasting through the finish line.
The clip is fiction and doesn't claim a real 0-60 time. Is the Tesla Roadster flying video real? explains how reveal footage differs from AI clips.
The example is landscape 16:9 and uses a silver minivan: the launch doesn't depend on a sports car.
Step 1: Open the 0-60 scene
Open the 0-60 launch in the studio. The link preselects the scene and loads its prompt. The Tesla Roadster 0-60 template page shows the same clip and prompt if you would rather read it first.
You need an account with credits to generate.
Step 2: Upload a sharp photo of your car
The scene's photo tip: a sharp side or front three-quarter photo of the car, with the whole body in frame. The opening shot is a low front three-quarter view, so a front three-quarter photo matches it best.
Do:
- Show the whole car, bumper to bumper, with the wheels visible.
- Shoot in daylight or in an evenly lit garage.
- Use your own car, a car you have permission to film, or a Roadster render.
Don't:
- Crop off the bumpers or upload a close-up of one wheel.
- Include other cars in the frame. They can blend into the result.
- Use a night shot with harsh reflections or a heavy color filter.
Step 3: Tweak the prompt (optional)
This is the scene prompt. It works as it is:
Use Image 1 as the visual reference for the car. Create a fictional drag-strip launch at dusk with stadium lights behind the start line. Open on a low front three-quarter view of the car. Cold-gas thrusters fire with a sharp burst of white vapor, a wall of smoke rolls across the strip and the car launches forward. Cut to a high drone shot chasing it down the strip, then a low side angle as it blasts through the finish line. Keep the body shape, paint and four wheels consistent. Clean footage only: no added titles, subtitles, logos or watermarks.
Change one thing at a time. Three edits that work well:
- Time of day. Change "at dusk with stadium lights behind the start line" to "at noon under a clear desert sky".
- Camera move. Replace "Cut to a high drone shot chasing it down the strip" with "Cut to a low tracking shot alongside the car" for a closer, faster feel.
- Location. Change "a fictional drag-strip launch" to "a fictional launch on an empty airport runway", and swap the two later mentions of "the strip" for "the runway".
Leave the last two sentences alone; they keep the car consistent and the footage clean.
Step 4: Choose landscape or vertical and generate
The example is 16:9 because the launch travels across the frame. Keep it for YouTube, a website or a presentation.
For TikTok, Instagram Reels or YouTube Shorts, pick 9:16 instead. In a tall frame, consider changing the last shot to "a low rear angle as it blasts through the finish line" so the car stays in view. Choose before you generate, because cropping later cuts off most of the frame.
Then choose the length and format offered in the studio, check the credit cost it shows and select Generate. You can close the page while it runs; the finished video appears in History.
Step 5: Download and post
Download the MP4 from History. When you post, label it as AI-generated, turn on the platform's AI label if it has one, and don't present it as a real acceleration test or as real Roadster footage. A caption such as "AI launch made from one photo of my minivan" makes that clear.
Tips to keep the car consistent
- One vehicle. Upload a photo with a single car and keep other vehicles out of the prompt.
- One action. This scene is a straight-line launch. Don't add a jump or a flip; the ramp scene is built for that.
- One camera move per shot. The prompt already has three shots. If you add one, remove another.
- Avoid fast spins. Burnouts that rotate the car, donuts and cameras that orbit the car are where the body shape and wheel count tend to drift.
- Simplify before you regenerate. Results vary between generations. If the car warps, cut an effect first, for example drop the smoke wall, before changing the photo.
FAQ
Do I need to write a prompt?
No. The 0-60 scene comes with a ready-made prompt. Upload your photo and generate; editing is optional.
Can I use my own car?
Yes. Any car, truck or van works; the example uses a minivan. A sharp photo with the whole vehicle in frame keeps its shape and color recognizable.
How much does it cost?
One-time credit packs start at $4.99 for 40 credits, no subscription needed, and pack credits never expire. Monthly plans are also available. There are no free credits. The studio shows the cost before you generate, and if a generation fails, the credits return to your balance automatically. See pricing, browse more launch and stunt scenes on the templates page, or read the full guide on how to make a Tesla Roadster AI video.